Tuesday, September 25, 2012

School Time: Color Activities

I've decided my kids need online names.  LegoLad (#1) and GameBoy (#2) are named for their interests, and #3's nickname is BusyBee 'cuz she is always on the go! You already know Mr L2D. Besides 5 fish that live in upstairs, that's our family. Pleased to meet you, too!
 
Well, school's started. LegoLad and GameBoy are gone all day and all morning, respectively.  It's just BusyBee (she's 20 months) and me. Time for some fun with a little learning snuck in!


Today we sorted colors.  She aced this, so I need to step up my game. Here's what we did.
 
I put a bunch of colored pompoms in a box. I spread out corresponding colored papers for the 8 colors I had.  I picked a color, named it and put it on the correct paper. By the third one she had taken over. She had to think a bit about some, but got every one correct!  Every time she picked up a color I named it for her--"Ooo... red. Where does the red go?" or something similar. 
 

Here's some other color activities that we did or are planning to do soon:
 
Dyed Pasta Stringing:  http://www.makeandtakes.com/coloring-pasta-making-necklaces
      --I love how bright the colors turn out when you use rubbing alcohol.  I had BusyBee thread them on a bamboo skewer stuck into a blob of homemade playdough. I keeps her occupied for over 30 minutes while I make dinner.


**After dying the noodles and carefully scooping them out, I put about a half cup rice in the bag and there was enough "juice" to dye it, too.  BusyBee loves scooping/pouring the rice into different containers.  
 
Fruit Loop Rainbow:  http://familycrafts.about.com/od/rainbows/a/cerealrainbow.htm
     --Sort and glue fruit loops into a rainbow. (Also can sort and string.)
 
Torn paper art: Tear construction paper into small pieces. Glue pieces on a paper shape. (Blue on a rain drop, yellow star, red heart, green leaf, white cloud, black wheel, etc…)

Lacing Cards: Glue construction paper onto a cereal box for strength. Cut out shape. Punch holes along edge and use as a lacing card with string. Cover with contact paper for more durability.

For Older Kids (Preschool)--
 
Chameleon Hunt: http://www.brighthubeducation.com/preschool-lesson-plans/61856-a-color-of-his-own-chameleon-lesson-plan/  After reading Leo Lionni's book A Color Of His Own, cut out chameleons from different colored papers. Take turns hiding each chameleon on an object that is the same color.
 
What's Missing? Game:  Fill a cookie sheet with 5-10 objects, all the same color. Have the children identify each object (i.e. toothbrush, sock, toy car, crayon, hairbow, cup, etc.). Cover the sheet with a towel and secretly remove an object. Uncover and have the children guess what's missing.  Adjust number of objects if the game is too easy or hard.
 
I Spy Book: Have kids gather as many objects (even magazine pictures) that will fit on one 8.5x11 sheet of paper.  Without touching, play “I spy with my little something that…(give a clue)”. Take picture of these color pages to make quiet books—I would put photos in inexpensive albums and give as Christmas gifts.
 
Iron-on Shapes. Have kids color a shape cut out of sand paper. Use lots of crayon! Turn upside down a white sheet of paper and cover with another piece of paper and iron.  You can buy iron-on fabric crayons to transfer to t-shirts or kitchen towels.

Cookie Cutter Painting: Place a small amount of paint on a plate. Show kids how to dip in paint and press on paper.

Color Wash Painting: Color a picture with crayons. Thin tempra paint and have children paint over the entire picture.  Paint won’t cover crayons making the drawing show through. Large paint brushes are best for this.

Dot Painting: Use bingo markers or ends of crayola markers (or glue sticks, pencil erasers, q-tips, etc) dipped in paint to create a picture with dots or to fill in a cut-out paper shape.


Tuesday, September 11, 2012

Garden Veggie Quiche

Mmmm... was dinner yummy! 


Here's the recipe.

Shredded hasbrowns, enough to cover bottom of pan
4 large eggs, (I used 5 medium)
3/4 cup milk (I used skim)
pinch of rosemary
pinch of thyme
chives to taste (I used 3 fresh "leaves?")
1/2 cup ham
1 cup shredded cheddar cheese, divided.
1/2 to 1 cup of shredded zuchini


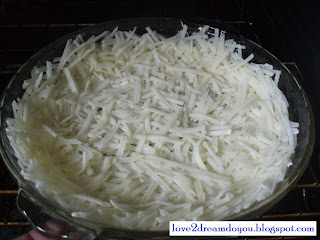
Press thawed hashbrowns into bottom of a well greased pie pan. Set oven to 400 and place hashbrowns in oven while it pre-heats.

Meanwhile, beat eggs, milk, rosemary, thyme, and chives. Chop ham and shred zucchini (I also peeled mine to make it more kid friendly.)


When hashbrown crust starts to brown around edges (about 30 minutes), remove.  On top of crust layer 1/2 cup cheese, zucchini, ham, and remaining cheese. Pour egg mixture over top.

Bake 400 for 30 minutes or until top is brown and eggs are cooked.  I can't use the "knife comes out clean" method for quiche, because I'm not smart enough to know if it is juice from the zucchini or ham or if it's melted cheese stuck to the knife. I bought a thermometer and religiously use that for testing meat and eggs-- 165 is considered safe for most foods.


Next time I'm going to remember to put some of my dried tomato slices on top. They'll help absorb the extra moisture, too. If you don't have dried, just use fresh.

VERDICT: I loved it. Gameboy ate it--which completely surprised me-- and so did BusyBee. Eldest LegoLad tried it but did like it. Mr. L2D said "yeah" when asked if he liked it. 4 out of 5 is better than most meals I make! Woohoo!  I made one for my gluten-free neighbor, her family loved it too!

Enjoy!

**linked at Frugal By Choice's Mostly Homemade Monday

Friday, September 7, 2012

Jazzed-up Jeans

Got a pair of jeans that are just plain 'ol blah?  Head on over to your local Dollar Tree and jazz them up with a pair of woven trivets. WHAT?! you say. Read on and find out how.


Supplies:
Pair of jeans- on hand
chalk- on hand, $1 a box
woven trivets- $1 a pair
scissors- on hand, $1
pins- on hand, $1
needle and thread- on hand, $1 (in sewing kits) [or sewing maching]

 
First you have to unravel the trivet. Do so by carefuly cutting the zizag stitches you can see in the photo. Remove bits of strings from resulting "rope."


Trace your pattern onto your jeans with chalk. While wearing my jeans, I drew my pattern standing in front of a mirror.


  Lay your rope along the design and giving yourself a bit extra for good measure, cut the rope to desired length. At this point, you'll want to pull out the foam middle, unless you want a puffier design. (The top scroll on my jeans still has the foam. I preferred the look without on the following scrolls so I will be picking that one off and pulling out the foam and then restitching it.)

 
Trim one end of the woven rope straight and tuck end inside itself.  Start with the tucked end and pin the rope onto the design.  When you get to the end, tuck the end into itself again, trimming if needed, and secure with a pin. 


Just stitch it on, with matching thread.  Or if you're an even stitcher, you could go bold with a contrasting color!


The design possiblities are endless. My store had multiple colors of trivets which you could stitch on a variety of clothing articles in an endless array of designs. How about even on a table runner. I'm thinking my solid colored comforter might even need some sprucing up! What will you do?

**linked up to dollarstorecrafts.com for their September Craft Challenge sponsored by DollarTree.com

EDITTED TO ADD: I picked off the top scroll and liked my jeans better without it. What do you think?

Wednesday, September 5, 2012

Backpack Hooks


My kid walks in the door and immediately drops his backpack in the middle of the kitchen floor on his way to the pantry for a sanck.  #2 had his first day of Kindergarten and came home and did the same thing. This bugs me, but aside from hanging them on a chair or stuffing them in the hall closet I recognized there wasn't a better solution-- believe me I tried several things last year.  We don't have a mud room. The garage door opens directly into the kitchen. The front entry is tiny.  I had a choice to make-- backpack hooks in the kitchen or in the front entry. 
When a guest arrives at your house, do you really want them to be greated by a row of backpacks? I don't think so. Decorative front entry means backpacks in the kitchen--it really wasn't a choice. 

I tried to make them nice. Mr. L2D made sure I attached them to wall studs. It is by far better to have them hung than strewn about the floor. And I learned it is impossible to match stains.

I found these hook racks at Honks All A Dollar. They were a buck. I bought 8! I bought them for the hooks alone--I have purchased hooks before and the cheap, plain ones are about $3 a piece.

I spray painted the hooks black (I'm in love with wrought iron) while they were still on the board. Once dry I removed the hooks and tossed the cheap board.

Time for a confession: I love Home Depot. I haunt their Paint Opps! section and also back by the cutting table in their scrap wood bins. I've made some scores there, including this board for 51 cents! I picked up some stain in what I thought would be the right color for under $5. One corner of the board was ruffed up along the edge. Easiest way to ruff up the other side to match was to rub in against the concrete driveway-- just a bit! It's much faster than sandpaper and gives a much more random rough look.

I gave it two coats of stain. When that was dried, I added the hooks. With Mr. L2D's stud finder I located the studs. I double checked them because they were not the standard 16" apart. Rather than using a nail and leaving a big hole, I pushed a pin through the drywall and it stopped against the stud. Sure enough, 19" apart-- who built this house! Anywho... I marked and pre-drilled the holes in the boards. I even drilled a larger hole at the surface to allow the screw head to sink flush with the board. Aren't you proud of me, Mr. L2D?!


Here it is! Mr. L2D came home and said it looked nice, which is high praise indeed from a "plain-blank-wall" kinda man.


The double hooks will allow jackets and coats to be hung up, too! And until #3 is in school, there is even a place for my purse. The whole thing cost me about $6 bucks, but there is a ton of stain leftover. That means I don't have to try to match stain for my next projects!!