Friday, January 31, 2014

Dinner with Kids

Let's be honest. It isn't always a picnic.  Dinnertime at our house is far from perfect but here's a few things that I do to survive it.

 After I've cooked dinner, my least favorite thing to hear is "I'm not eating that!" spoken with a bunched up nose. I refuse to subside on hot dogs, spaghetti, and chicken nuggets. As the mom I have 3 options:
1. I make one dinner, if you don't want to eat it you can go hungry.  This option doesn't really work because we all know that hungry children equals emotional meltdowns from all parties involved. Bedtime doesn't come soon enough in this situation.
2. Make your own dinner, then. PBandJ sandwiches do not provide adequate nutrition and won't expand their narrow palates.
Here's my third option.
3. Make layered meals-- meals that are assembled in steps and that can be consumed at any point along the assembly process. (Was that clear as mud?)

For instance: I've been dying to try that Baked Fajita recipe that I've seen floating around Pinterest. The one where you toss everything in a pan and bake it instead of frying it-- like this one. http://www.thebakerupstairs.com/2013/07/baked-chicken-fajitas.html
 
So easy. So yummy! I will never fry fajitas again. Seriously, this recipe is a keeper. Try it. But would my picky eaters eat it...nope.
Two kids ate just a tortilla with sour cream, cheese, and lettuce. (I had them try a piece of the chicken on the side.)  Number 3 ate hers with all those plus some of the chicken shredded inside.  I ate the works. And then, for good measure, had a second fajita in a lettuce wrap to save a few calories. ;)  The plus for me: I only had to make one dinner.
 
More layered dinner ideas: 
Sweet and Sour Chicken over rice-- serve the sauce separate and buy good quality chicken nugget
Meatball Stroganoff-- pasta, meatballs, with the sauce separate
Baked Potato Bar-- add your own toppings
Hawaiian Haystacks-- add your own toppings
Chicken Alfredo-- pasta, grilled chicken, with sauce separate 
Individual Pizzas-- every makes their own
Tacos-- fill it with your favorite toppings
 
I also try to have at least one side that each kid will eat, whether it's fruit, veggie, or bread.
 
To really combat the complaining we had a sit-down conversation with the oldest two when they were 5 and 7. We came up with these rules and posted them by the table.
Number 6 is strictly enforced. I'm thinking of adding -- #9 Please clear your dishes from the table.
 
Got any more good family-friendly recipes or ways to teach mealtime manners?


Saturday, January 18, 2014

Wooden Heart

It's almost Valentine's Day.  Time for a romantic dinner (of pizza and popcorn) and movie (probably Pokémon or Pocoyo). Man, I can't wait 'til Son #1 is old enough to babysit. Hubby and I actually did get to catch a movie last night... in the basement... I rented Smurf's for the kiddos upstairs and we watched The Host downstairs. (A quick movie review: The Host stays real close to the book except you don't get a feel for time passing--everything seems to happen fast when in the book it was actually longer. If I hadn't read the book, I don't think I would have liked the movie much.) Anyways...

I wanted to show you this great wooden heart that my mom made me.


I'm in to simple rustic décor and my family room is patriotic in theme. It fits in great so I leave it up all year next to my wooden flag and just move it to the front door for Valentine's Day.


Here's the measurements for the trim pieces if you want to make your own.
2 @ 21 1/2"
2 @ 6"
2 @ 7"

Paint. Wood glue or nail the pieces together and add a little décor. A little twine to the top for easy hanging and you've got yourself some love.


Friday, January 17, 2014

Pumpkin Muffins and Cookies

While going through the pantry looking for dinner ideas, I found a large can of pumpkin. It called for me to make it into pumpkin goodies. Son #1 wanted cookies. I wanted muffins. A quick google search provided recipes.  Luckily I had two spice cake mixes in the cold storage room downstairs.

Here's the recipe.

PUMPKIN MUFFIN COOKIES
Ingredients:
1 29oz can pumpkin
2 15oz spice cake mixes
lots and lots of chocolate chips

Directions:
Mix. Scoop some cookies. Fill some muffin liners. Scoop the remaining into more cookies. Bake at 350. Don't burn 'em. Lick the spoon, 'cuz there ain't no eggs in it.


Glad I made cookies AND muffins, because you can't send cookies to school for lunches but muffins are A-OK, right? Right.
Also glad I found that can of pumpkin before spring. I think it's against cooking laws to bake with pumpkin and spice when it's above 60 degrees. Strictly a winter food. What's your winter comfort food? 


Thursday, January 16, 2014

Hello, again. I'd like you to meet my table.

One whole year.  Life just took over. I have huge respect for bloggers that can keep it all together. I am not one of them.  So I'm going to take things slower this year and see what happens.

A year in review.
Hubby still has a job-- God bless his employer! Two oldest boys are in school all day now, which just leaves Busy Bee and me at home. Why don't I have more time? Can't figure this one out.

Wanna see my huge project last year? Heard of Ana White? I'm in love with her site and ideas. We have been in our house for 5 years and my dining room was begging for a large table to replace the hand-me down we got our second year of marriage. While it had 3 leaves, it was old, chipped and water stained. I toyed with refinishing it but I really didn't like the shape of the table legs anyway.  Then I found Ana White's Triple Pedestal Farm House Table. Instant love. Sold my table for $20 (yep, that's all I could get for it) and told my hubby that I was going to build a table.  He bought me the wood needed for my b-day.  Then he left the project to me.

After receiving major help from my father and father-in-law, here's what we created. Ain't she a beauty.

 There was no way I was going to try to cut out 28 matching arches for the leg braces... not happening. Father-in-law suggested 2x4's at an angle-- and they look great! So much easier. The edge was supposed to have a recessed 1x2 around it, but that created a ledge that I was just not willing to clean-- I got young kids, 'member? I also wanted to be able attach my pasta press and wheat grinder to the table top (since my kitchen counters are too thick) so my father suggested cutting the edges at each end like shown above.


 The original plans called for a 9 ft bench on each side.  I chose to do chairs and 2 benches just over 4 feet instead. I can put them both on one side or one on each side now.  I also made my benches with cheaper 2x4 instead of 2x6 feet. To make them easier I just used a solid plank of wood instead of piecing the tops together to match the table.

See that beautiful knot.  I couldn't fill that with wood filler, but I didn't want it to pack with food either. I took a tiny paint brush to get some stain down inside and then used Glossy Accents to fill it in the crack. It sanded down beautiful and clear. Now I can still see those beautiful knots!

Now Ana's plans say $125 was the cost to build her table. The wood cost about that much for me. That didn't include the screws, wood glue, stain, and polyurethane coating. But including the benches I was about $200 for everything (minus the new tools needed) which is much cheaper than what I could have bought a new 9 foot table for.  It also didn't take me 10 hours like it took Ashley over at Shanty-2-Chic. More like 2 months! I probably spent 10 hours just sanding. The top was the most time consuming because I didn't want any cracks or seams for food to get stuck in. It was all worth it. I love my beauty. Thanks Ana!

ETA: How we attached the angle braces on the pedestals-
From longest tip to tip they measure about 9". My father-in-law drilled three 1/2" holes about a 1/2" or so deep.  After pre-drilling for the screws, we fastened them on using 3 inch screws for the top and bottom holes and the middle hole got two 6 inch screws (they were LONG!). Then we cut a 1/2" dowel to create some wood plugs. The middle plug was cut straight on both sides, but the top and bottom ones were cut with one side at an angle-- less sanding. I applied a little glue and tapped them into place. Then I sanded them flush. Not liking the space some of them had I used some stainable wood filler around the plugs (except for the braces on the underside of the table-- 'cuz who is going to look there?) and re-sanded.  Here's a picture and a super-nifty drawing ;)

Yikes! Look at the dust already! Oh, on the benches we just used one hole and screw in the middle.

Thursday, December 13, 2012

Christmas Tree Card Holder

 
I use to tape my Christmas cards to the blinds on the back door.  I never found a card holder that I particularly liked-- one that look good with or without cards.

Enter some sticks, hot glue, and twine-- all things I have on hand in my craft room and outside on the ground.

I measured the blank wall I have in the hallway and broke my first stick to that length. Then I worked my way up, laying the sticks out on the driveway, making sure my sticks laid pretty flush to the ground (and thus the wall so I wouldn't inadvertently skewer someone).  I little hot glue and then some twine for extra security.

I love it. Now my mom wants one.  I love almost free crafts!


Saturday, November 17, 2012

Christmas Candles


I'm dreaming of a white Christmas... and it's not even Thanksgiving! I don't think I'm going to be able to wait to decorate until after Thanksgiving.  I had to sneak in a little Christmas project and the dollarstorecrafts.com 's Christmas Decor Challenge sponsored by DollarTree was the perfect excuse!


I was wandering the isle of my DollarTree when I came upon a new item. I snatched up 3 right away.  Faux wax LED Candles! They are plastic dipped in wax so they really feel/look like candles, except lighter.  Do you recognize them from my previous post on my new mantel?

I made them new collars in anticipation of my Christmas mantel. Here's what I did.

Materials:
3 Faux wax LED candles ($1 each)
1 bag mints ($1)
2 sheets cardstock (red, white; on hand)
tissue paper ($1, on hand)
hot glue


I cut a strip of cardstock and glued it so it fit loosely around the candle--I wanted to be able to remove it. For the first candle, I hot glued mints around that cardstock collar in 3 rows.


For the second candle I cut strips of tissue paper sheets (about 2.5 inches wide), twisted them, and glued them around another cardstock collar.


For the third one, I used a glue stick to glue printed tissue paper around yet another cardstock collar. You could also use Christmas wrapping paper.  (Missed the picture, but you can see it below)

That's it... super easy, huh?


Then, do you know what I discovered? By setting the candles on a small objects of varying heights (I used a small playdough container and a cooking spray lid) and sliding the cardstock collars down, you create the illusion that your candles are different heights!


There are so many ways you could decorate the cardstock collars to change out your candles for the different seasons and occasions. Like these ones on my Thanskgiving mantel.


Happy Crafting!
*Linking up to DollarStoreCrafts.com Holiday Decoration Challenge

I Hate My Mantel...Remake


Yeah. It's looked about like this since we moved in. I keep finding things that I might want to put there, so there they sit. Maybe this...how about that...this is cute...what about this here... ugh! I couldn't commit to anything. And nothing was coming together.

So it all came down!

I decided that I might have a commitment issue. I'm going to try switching out my decor for the seasons... then I only have to commit to 3 months (or less!). I don't want to break the bank, nor do I want to create a storage issue.  My goal is to have easy to store and/or versatile decor.


Here's what I came up with, and I only spent $4.50, with most of it coming from things I had around the house.

My friend gave me these cute indian corn cobs-- they are actually popcorn, and yes, I saved some to try and pop!  I took some cardstock to make a collar around these Dollar Tree candles.  A little hot glued and these faux wax LED candles look perfect. Best of all I can slip them out and make new collars for all the seasons. 


I saved the husks and glued them aroung a cardboard circle. My small pine tree was kind enough to lend me some pinecones for the middle of the flower.  I cut some colorful branches for the vase and tossed in some pumpkins to finish off the look. 

No time to create the fabulous large wood plaque I envisioned, so I covered my large picture frame with kraft paper and painted a thankful message.


I'm excited about how it turned out. Even more excited that I'm only committed to it for a few more weeks. You'll have to stay tuned for my Christmas mantel!  Christmas goes up the day after Thanksgiving at my house... how about at yours?

Friday, October 19, 2012

Fall Wreath

Have you seen those creepy grapevine wreaths with the snakes. It's all painted black and super spooky. Yeah, I made one of those, except I haven't made it to the store to get black spray paint so it sits in my crap craft room in all it's naked snake glory. Can't put THAT on my front door!


I needed a quick wreath so I skipped holidays and went for a fall themed wreath. I was inspired by thriftycraftygirl.com 's Spooky Ribbon Wreath only I didn't have ribbon--but I do have lots of fabric scraps!

A while ago I picked up an embroidery hoop at the thrift store--one hoop can make two wreaths using the inner and the outer circles! I rolled up newspaper and used twisty ties to secure it to the outside edge of hoop.

I cut strips of scrap material and tied them around randonly.  After they were tied I trimmed them and attached some indian popcorn (they are small cobs than regular indian corn) at the top. Quick and easy and it gave my hands something to do while my ears listened to the media's opinions on last tuesday's debate. Good times!

 
As soon as I get some paint I'll swap the wreaths out and then post a picture of the snake one!

Friday, October 12, 2012

Crispy Crockpot Chicken

Crispy? Yes, you read that right! Here's how you do it.

I took my whole chicken (innards removed!) and gave it a rinse. I plopped it in my crockpot. Next comes my favorite part-- my little secret that I'm going to share with you.

Have you seen these?
 
See all the fantastic flavor options? And this is ain't all of them!

I'm in love with them. Oh, so tasty. And I use them for more than just marinating and grilling!
Tonight I picked Mojito Lime. Mmmm... I just sprinkled 1/2 the package on top of the chicken. No rubbing or anything fancy. I rolled up the seasoning to save for another time.

Turn on your crockpot on low and cover. Cook for 3 hours. Now here comes the crispy part. Ready?


Stick a wooden spoon under the lid for the last hour. Getting that steam out will allow the skin to crisp up. Now we aren't talking Kentucky Fried crispy. It's more like rotisserie crispy. But that's a ton better than slippery, slimy! 


Now my chicken was just under 5 lbs. It cooked a LOT faster than I thought it would (I was planning on it taking 6 hours!). It's been done since 4:00 and dinner can't be for at least another hour. But that's the lovely thing about crock pots. I've left it plugged in and vented with the spoon. It'll be fine.

See. Mmmm... Please pass the rice!

Saturday, October 6, 2012

Costume for a dollar, or less!

Need a costume quick? Don't have much time or money? Here ya go!

What you need:
Laundry basket ($1 at DollarTree, on hand)
Scissors (on hand)
Assorted clothes (on hand)
Empty laundry detergent bottle ($1 at DollarTree, on hand)

How To: I'm sure you can figure it out from the picture above! With heavy duty scissors, I cut out the bottom of the laundry basket. Mine snuggled perfectly when pulled up to my hips but if yours is loose, make two shoulder straps from two long-sleeved shirts with the sleeve cuffs safety pinned to the front and back of basket. Stuff with random clothes--personal preference is clean clothes so I would not have to smell dirty socks all night, but if you're brave enough to go authentic, go for it!
Grab a bottle of laundry detergent, a stain stick and or dryer sheets (hey, these might make your dirty clothes smell tolerable!).  Feel free to really heap the clothes as much as you want. You'll be toasty warm if you safety pin more clothes to your shirt and/or hat.

Need a couples costume. Decorate a box to look like the washing machine for your other half!

Mr. L2D says he'd like to use this idea for Halloween, so I guess I need to make a washing machine for me.

**Enter in dollartree.com 's October Craft Challenge, sponsored by DollarTree.**


Tuesday, September 25, 2012

School Time: Color Activities

I've decided my kids need online names.  LegoLad (#1) and GameBoy (#2) are named for their interests, and #3's nickname is BusyBee 'cuz she is always on the go! You already know Mr L2D. Besides 5 fish that live in upstairs, that's our family. Pleased to meet you, too!
 
Well, school's started. LegoLad and GameBoy are gone all day and all morning, respectively.  It's just BusyBee (she's 20 months) and me. Time for some fun with a little learning snuck in!


Today we sorted colors.  She aced this, so I need to step up my game. Here's what we did.
 
I put a bunch of colored pompoms in a box. I spread out corresponding colored papers for the 8 colors I had.  I picked a color, named it and put it on the correct paper. By the third one she had taken over. She had to think a bit about some, but got every one correct!  Every time she picked up a color I named it for her--"Ooo... red. Where does the red go?" or something similar. 
 

Here's some other color activities that we did or are planning to do soon:
 
Dyed Pasta Stringing:  http://www.makeandtakes.com/coloring-pasta-making-necklaces
      --I love how bright the colors turn out when you use rubbing alcohol.  I had BusyBee thread them on a bamboo skewer stuck into a blob of homemade playdough. I keeps her occupied for over 30 minutes while I make dinner.


**After dying the noodles and carefully scooping them out, I put about a half cup rice in the bag and there was enough "juice" to dye it, too.  BusyBee loves scooping/pouring the rice into different containers.  
 
Fruit Loop Rainbow:  http://familycrafts.about.com/od/rainbows/a/cerealrainbow.htm
     --Sort and glue fruit loops into a rainbow. (Also can sort and string.)
 
Torn paper art: Tear construction paper into small pieces. Glue pieces on a paper shape. (Blue on a rain drop, yellow star, red heart, green leaf, white cloud, black wheel, etc…)

Lacing Cards: Glue construction paper onto a cereal box for strength. Cut out shape. Punch holes along edge and use as a lacing card with string. Cover with contact paper for more durability.

For Older Kids (Preschool)--
 
Chameleon Hunt: http://www.brighthubeducation.com/preschool-lesson-plans/61856-a-color-of-his-own-chameleon-lesson-plan/  After reading Leo Lionni's book A Color Of His Own, cut out chameleons from different colored papers. Take turns hiding each chameleon on an object that is the same color.
 
What's Missing? Game:  Fill a cookie sheet with 5-10 objects, all the same color. Have the children identify each object (i.e. toothbrush, sock, toy car, crayon, hairbow, cup, etc.). Cover the sheet with a towel and secretly remove an object. Uncover and have the children guess what's missing.  Adjust number of objects if the game is too easy or hard.
 
I Spy Book: Have kids gather as many objects (even magazine pictures) that will fit on one 8.5x11 sheet of paper.  Without touching, play “I spy with my little something that…(give a clue)”. Take picture of these color pages to make quiet books—I would put photos in inexpensive albums and give as Christmas gifts.
 
Iron-on Shapes. Have kids color a shape cut out of sand paper. Use lots of crayon! Turn upside down a white sheet of paper and cover with another piece of paper and iron.  You can buy iron-on fabric crayons to transfer to t-shirts or kitchen towels.

Cookie Cutter Painting: Place a small amount of paint on a plate. Show kids how to dip in paint and press on paper.

Color Wash Painting: Color a picture with crayons. Thin tempra paint and have children paint over the entire picture.  Paint won’t cover crayons making the drawing show through. Large paint brushes are best for this.

Dot Painting: Use bingo markers or ends of crayola markers (or glue sticks, pencil erasers, q-tips, etc) dipped in paint to create a picture with dots or to fill in a cut-out paper shape.


Tuesday, September 11, 2012

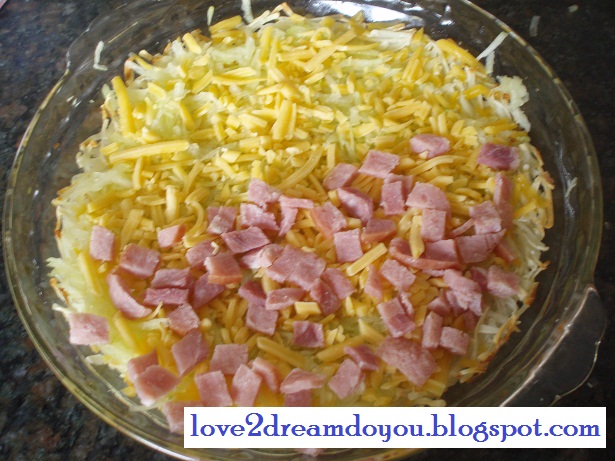
Garden Veggie Quiche

Mmmm... was dinner yummy! 


Here's the recipe.

Shredded hasbrowns, enough to cover bottom of pan
4 large eggs, (I used 5 medium)
3/4 cup milk (I used skim)
pinch of rosemary
pinch of thyme
chives to taste (I used 3 fresh "leaves?")
1/2 cup ham
1 cup shredded cheddar cheese, divided.
1/2 to 1 cup of shredded zuchini


Press thawed hashbrowns into bottom of a well greased pie pan. Set oven to 400 and place hashbrowns in oven while it pre-heats.

Meanwhile, beat eggs, milk, rosemary, thyme, and chives. Chop ham and shred zucchini (I also peeled mine to make it more kid friendly.)


When hashbrown crust starts to brown around edges (about 30 minutes), remove.  On top of crust layer 1/2 cup cheese, zucchini, ham, and remaining cheese. Pour egg mixture over top.

Bake 400 for 30 minutes or until top is brown and eggs are cooked.  I can't use the "knife comes out clean" method for quiche, because I'm not smart enough to know if it is juice from the zucchini or ham or if it's melted cheese stuck to the knife. I bought a thermometer and religiously use that for testing meat and eggs-- 165 is considered safe for most foods.


Next time I'm going to remember to put some of my dried tomato slices on top. They'll help absorb the extra moisture, too. If you don't have dried, just use fresh.

VERDICT: I loved it. Gameboy ate it--which completely surprised me-- and so did BusyBee. Eldest LegoLad tried it but did like it. Mr. L2D said "yeah" when asked if he liked it. 4 out of 5 is better than most meals I make! Woohoo!  I made one for my gluten-free neighbor, her family loved it too!

Enjoy!

**linked at Frugal By Choice's Mostly Homemade Monday

Friday, September 7, 2012

Jazzed-up Jeans

Got a pair of jeans that are just plain 'ol blah?  Head on over to your local Dollar Tree and jazz them up with a pair of woven trivets. WHAT?! you say. Read on and find out how.


Supplies:
Pair of jeans- on hand
chalk- on hand, $1 a box
woven trivets- $1 a pair
scissors- on hand, $1
pins- on hand, $1
needle and thread- on hand, $1 (in sewing kits) [or sewing maching]

 
First you have to unravel the trivet. Do so by carefuly cutting the zizag stitches you can see in the photo. Remove bits of strings from resulting "rope."


Trace your pattern onto your jeans with chalk. While wearing my jeans, I drew my pattern standing in front of a mirror.


  Lay your rope along the design and giving yourself a bit extra for good measure, cut the rope to desired length. At this point, you'll want to pull out the foam middle, unless you want a puffier design. (The top scroll on my jeans still has the foam. I preferred the look without on the following scrolls so I will be picking that one off and pulling out the foam and then restitching it.)

 
Trim one end of the woven rope straight and tuck end inside itself.  Start with the tucked end and pin the rope onto the design.  When you get to the end, tuck the end into itself again, trimming if needed, and secure with a pin. 


Just stitch it on, with matching thread.  Or if you're an even stitcher, you could go bold with a contrasting color!


The design possiblities are endless. My store had multiple colors of trivets which you could stitch on a variety of clothing articles in an endless array of designs. How about even on a table runner. I'm thinking my solid colored comforter might even need some sprucing up! What will you do?

**linked up to dollarstorecrafts.com for their September Craft Challenge sponsored by DollarTree.com

EDITTED TO ADD: I picked off the top scroll and liked my jeans better without it. What do you think?